<?xml version="1.0" encoding="utf-8"?><feed xmlns="http://www.w3.org/2005/Atom" ><generator uri="https://jekyllrb.com/" version="3.10.0">Jekyll</generator><link href="http://rjrpaz.github.io/feed.xml" rel="self" type="application/atom+xml" /><link href="http://rjrpaz.github.io/" rel="alternate" type="text/html" /><updated>2026-04-08T11:57:06+00:00</updated><id>http://rjrpaz.github.io/feed.xml</id><title type="html">Some random notes</title><subtitle>Some random notes</subtitle><entry><title type="html">Create email for outlook using python</title><link href="http://rjrpaz.github.io/outlook/python/2021/12/29/Create_email_for_outlook_using_python.html" rel="alternate" type="text/html" title="Create email for outlook using python" /><published>2021-12-29T03:00:00+00:00</published><updated>2021-12-29T03:00:00+00:00</updated><id>http://rjrpaz.github.io/outlook/python/2021/12/29/Create_email_for_outlook_using_python</id><content type="html" xml:base="http://rjrpaz.github.io/outlook/python/2021/12/29/Create_email_for_outlook_using_python.html"><![CDATA[<p>This is an example of how to use python using outlook.</p>

<p>There are some cases when we need to use an email client to send an email instead of sending it using a python script in batch mode (typically using SMTP or SMTPAuth).</p>

<p>The script uses win32 calls to connect to Outlook, so this will run in Windows environments only.</p>

<h2 id="install-required-libraries">Install required libraries</h2>

<p>I’m assuming you already installed Python3 in your Windows box.</p>

<p>You can create a virtual env to run the script. First, install the virtualenv module from a DOS console as follows:</p>

<div class="language-console highlighter-rouge"><div class="highlight"><pre class="highlight"><code><span class="go">pip install virtualenv
</span></code></pre></div></div>

<p>Now create the virtualenv:</p>

<div class="language-console highlighter-rouge"><div class="highlight"><pre class="highlight"><code><span class="go">virtualenv venv
</span></code></pre></div></div>

<p>Start the virtualenv:</p>

<div class="language-console highlighter-rouge"><div class="highlight"><pre class="highlight"><code><span class="go">venv\Scripts\activate.bat
</span></code></pre></div></div>

<p>Inside virtualenv, install <em>pywin32</em> module:</p>

<div class="language-console highlighter-rouge"><div class="highlight"><pre class="highlight"><code><span class="go">pip install pywin32
</span></code></pre></div></div>

<p>The virtual environment is ready to run a script like the following:</p>

<div class="language-console highlighter-rouge"><div class="highlight"><pre class="highlight"><code><span class="gp">#</span><span class="o">!</span>/usr/bin/env python
<span class="go">import sys
import win32com.client as client

html_body = """
</span><span class="gp">&lt;div&gt;</span><span class="w">
</span><span class="go">Hello. This is a sample email.
</span><span class="gp">&lt;/div&gt;</span>&lt;br&gt;
<span class="gp">&lt;div&gt;</span><span class="w">
</span><span class="go">Using html will present the body in enriched format.
</span><span class="gp">&lt;/div&gt;</span>&lt;br&gt;
<span class="gp">&lt;div&gt;</span><span class="w">
</span><span class="gp">Check original documentation for pywin32 &lt;a href='https://pypi.org/project/pywin32/'&gt;</span>here&lt;/a&gt;
<span class="gp">&lt;/div&gt;</span><span class="w">
</span><span class="go">    """

recipient = "john@example.com"
cc = "peter@example.com"


def create_email(recipient, cc):
    """Create an email with summary information"""
    outlook = client.Dispatch('Outlook.Application')
    message = outlook.CreateItem(0)
    message.To = recipient
    message.CC = cc
</span><span class="gp">#</span><span class="w">    </span>message.Attachments.Add<span class="o">(</span>file<span class="o">)</span> <span class="c"># You can attach a file with this</span>
<span class="go">    message.Subject = 'Mail sent using python + Outlook'
    message.HTMLBody = html_body
    message.Display()

def main():
    create_email(recipient, cc)

if __name__ == "__main__":
    main()
</span></code></pre></div></div>

<p>The result of running this is:</p>

<p><img src="/assets/images/Outlook from python.png" alt="Create an outlook email using python" /></p>

<p>This is an email ready to checked and sent.</p>]]></content><author><name></name></author><category term="outlook" /><category term="python" /><summary type="html"><![CDATA[This is an example of how to use python using outlook.]]></summary></entry><entry><title type="html">Using netaddr library to manage ip addresses in python3</title><link href="http://rjrpaz.github.io/python/netaddr/2021/12/23/Using_netaddr_library_to_manage_ip_addresses_in_python3.html" rel="alternate" type="text/html" title="Using netaddr library to manage ip addresses in python3" /><published>2021-12-23T00:00:00+00:00</published><updated>2021-12-23T00:00:00+00:00</updated><id>http://rjrpaz.github.io/python/netaddr/2021/12/23/Using_netaddr_library_to_manage_ip_addresses_in_python3</id><content type="html" xml:base="http://rjrpaz.github.io/python/netaddr/2021/12/23/Using_netaddr_library_to_manage_ip_addresses_in_python3.html"><![CDATA[<p>Using netaddr library to manage ip addresses in python3</p>

<p><em>netaddr</em> is a very handy lib to do ip address manipulation in python. Home for this project here: <a href="https://pypi.org/project/netaddr/">https://pypi.org/project/netaddr/</a></p>

<p>A sample scenario to use this library is to use it as a very basic IP calculator.</p>

<p>For example, you can provide an IP address in CIDR format and you can get all related IP entities.</p>

<pre><code class="language-python3">#!/usr/bin/env python3
import sys
import re
from netaddr import IPNetwork, IPAddress
import socket
import struct

'''
This sample code uses netaddr lib to do very basic ip calculation starting from an IP address.

This code assumes the gateway address is the first valid IP address from the network.
'''

if len(sys.argv) != 2:
    print("Usage:\n\t%s cidr\n\nEx:\n\t%s 192.168.1.112/24" % (sys.argv[0], sys.argv[0]))
    exit(0)

address = str(sys.argv[1])

p = re.compile('^[0-9]+\\.[0-9]+\\.[0-9]+\\.[0-9]+\/([0-9]+)$')

result = p.search(address)
netmask = result.group(1)

if int(netmask) &gt; 32:
    print("Netmask %s is not valid" % netmask)
    exit(1)

ip = IPNetwork(address)

print ("IP address: %s" % ip.ip)
print ("Netmask:    %s" % ip.netmask)
print ("Network:    %s" % ip.network)
print ("Broadcast:  %s" % ip.broadcast)
gateway = IPAddress(int(ip.network) + 1)
print ("Gateway:    %s" % gateway)

exit(0)
</code></pre>

<p>Sample runs:</p>

<div class="language-console highlighter-rouge"><div class="highlight"><pre class="highlight"><code><span class="gp">roberto@notebook:~$</span>./netInfo.py 192.168.1.140/25
<span class="go">IP address: 192.168.1.140
Netmask:    255.255.255.128
Network:    192.168.1.128
Broadcast:  192.168.1.255
Gateway:    192.168.1.129
</span><span class="gp">roberto@notebook:~$</span><span class="w">
</span></code></pre></div></div>

<div class="language-console highlighter-rouge"><div class="highlight"><pre class="highlight"><code><span class="gp">roberto@notebook:~$</span>./netInfo.py 10.0.2.7/8
<span class="go">IP address: 10.0.2.7
Netmask:    255.0.0.0
Network:    10.0.0.0
Broadcast:  10.255.255.255
Gateway:    10.0.0.1
</span><span class="gp">roberto@notebook:~$</span><span class="w">
</span></code></pre></div></div>]]></content><author><name></name></author><category term="python" /><category term="netaddr" /><summary type="html"><![CDATA[Using netaddr library to manage ip addresses in python3]]></summary></entry><entry><title type="html">Using ansible to manage vmware</title><link href="http://rjrpaz.github.io/ansible/vmware/iac/2021/12/21/Using_ansible_to_manage_vmware.html" rel="alternate" type="text/html" title="Using ansible to manage vmware" /><published>2021-12-21T00:00:00+00:00</published><updated>2021-12-21T00:00:00+00:00</updated><id>http://rjrpaz.github.io/ansible/vmware/iac/2021/12/21/Using_ansible_to_manage_vmware</id><content type="html" xml:base="http://rjrpaz.github.io/ansible/vmware/iac/2021/12/21/Using_ansible_to_manage_vmware.html"><![CDATA[<p>Using ansible to manage vmware</p>

<p>This projects includes a set of ansible playbook to manage vmware-based infrastructure: <a href="https://github.com/rjrpaz/ansible-vmware">https://github.com/rjrpaz/ansible-vmware</a></p>

<p>Playbooks include some very basic VM tasks like:</p>

<ul>
  <li>get summary information from a VM</li>
  <li>creating a VM</li>
  <li>get a list of VMs from the cluster</li>
  <li>get size of a VM (real storage size, not nominal size)</li>
  <li>get a list of VMs from the cluster</li>
  <li>get disk information from a VM</li>
  <li>power on/power off a VM</li>
  <li>set CPU/memory size</li>
  <li>set/unset hot add values that allows hot resizing for CPU and memory</li>
  <li>set VM OS version according to the VMWare labeling reference</li>
  <li>set hot add values that allows hot resizing for CPU and memory</li>
  <li>rename a VM</li>
  <li>remove a VM</li>
  <li>move a VM to a different folder</li>
  <li>upgrade VMWare tools in a VM</li>
  <li>clone VM from an existent template</li>
  <li>clone a new template from an existent template</li>
</ul>

<p>Allows to get information from the VMWare cluster:</p>

<ul>
  <li>get summary information from cluster host</li>
  <li>get host info</li>
  <li>get cluster info</li>
  <li>get DSR rules</li>
  <li>get datastores (emptiest one as an example)</li>
  <li>get DVS portgroups</li>
  <li>get resource pool</li>
</ul>

<p>Allows to manage VM snapshots:</p>

<ul>
  <li>get list of snapshots</li>
  <li>take a snapshot</li>
  <li>remove a snapshot</li>
  <li>revert VM to a specific snapshot</li>
</ul>

<p>Allows to manage disks:</p>

<ul>
  <li>add a disk</li>
  <li>delete last added disk</li>
  <li>resize a disk</li>
</ul>

<h2 id="some-thoughts-about-this-project">Some thoughts about this project</h2>

<p>This playbooks use the community edition of the ansible modules: <a href="https://github.com/ansible-collections/community.vmware">https://github.com/ansible-collections/community.vmware</a></p>

<p>This modules use pyvmomi underneath, so this tool is required: <a href="https://github.com/vmware/pyvmomi">https://github.com/vmware/pyvmomi</a></p>

<p>This playbooks are checked using <em>ansible lint v. 5.3.1</em>.</p>

<p>Most of this playbooks use <em>name</em> as the parameter to identify a VM. However, name are not necessarily unique in a VMWare cluster. If this is the case, playbook should be modified to use <strong>uuid</strong>, which is a unique identifier to a VM.</p>

<p>A lot of vmware modules accept <em>datacenter</em> or <em>cluster</em> name as valid input parameters. This playbooks use the first option in most cases.</p>

<p>You can run a playbook as follows:</p>

<div class="language-console highlighter-rouge"><div class="highlight"><pre class="highlight"><code><span class="go">ansible-playbook -i 'localhost,' playbook.yml
</span></code></pre></div></div>

<p>Extra vars are prompted. You can run the playbook in a single command line passing the extra vars like this:</p>

<div class="language-console highlighter-rouge"><div class="highlight"><pre class="highlight"><code><span class="go">ansible-playbook -i 'localhost,' -e "extra_var1=extra_var_value1 extra_var2=extra_var_value2 ..." playbook.yml
</span></code></pre></div></div>]]></content><author><name></name></author><category term="ansible" /><category term="vmware" /><category term="IaC" /><summary type="html"><![CDATA[Using ansible to manage vmware]]></summary></entry><entry><title type="html">Deploy a static web page using helm and traefik</title><link href="http://rjrpaz.github.io/kubernetes/helm/terraform/iaac/2021/09/12/Deploy-a-static-web-page-using-helm-and-traefik.html" rel="alternate" type="text/html" title="Deploy a static web page using helm and traefik" /><published>2021-09-12T00:00:00+00:00</published><updated>2021-09-12T00:00:00+00:00</updated><id>http://rjrpaz.github.io/kubernetes/helm/terraform/iaac/2021/09/12/Deploy-a-static-web-page-using-helm-and-traefik</id><content type="html" xml:base="http://rjrpaz.github.io/kubernetes/helm/terraform/iaac/2021/09/12/Deploy-a-static-web-page-using-helm-and-traefik.html"><![CDATA[<p>Deploy a static web page using helm and traefik</p>

<p>The purpose of this lab is to provision a static web page using <em>helm</em> and <em>traefik</em> as ingress entry point.</p>

<p>Main documentation for the lab is included here: <a href="https://www.robertopaz.com.ar/deploy-using-helm/">https://www.robertopaz.com.ar/deploy-using-helm/</a></p>

<p>You can clone the repository to get some of the files required for the lab: <a href="https://github.com/rjrpaz/deploy-using-helm">https://github.com/rjrpaz/deploy-using-helm</a></p>

<h2 id="steps">Steps</h2>

<ol>
  <li>
    <p>Build your own Docker image that can serve a static “Hello World” HTML page</p>
  </li>
  <li>
    <p>Deploy that image as a container in a Kubernetes cluster running locally on your machine using helm and writing your own chart</p>
  </li>
  <li>
    <p>Deploy a Traefik container in the same local Kubernetes cluster using helm</p>
  </li>
  <li>
    <p>Make Traefik an ingress point to access the “Hello World” page</p>
  </li>
  <li>
    <p>Make the “Hello World” page accessible locally at <code class="language-plaintext highlighter-rouge">http://hello-world.local</code></p>
  </li>
</ol>

<p>The whole process is automatized using <em>terraform</em></p>]]></content><author><name></name></author><category term="kubernetes" /><category term="helm" /><category term="terraform" /><category term="IaaC" /><summary type="html"><![CDATA[Deploy a static web page using helm and traefik]]></summary></entry><entry><title type="html">Creating VMWare home lab</title><link href="http://rjrpaz.github.io/virtualization/vmware/2021/08/24/Creating_VMWare_homelab.html" rel="alternate" type="text/html" title="Creating VMWare home lab" /><published>2021-08-24T03:00:00+00:00</published><updated>2021-08-24T03:00:00+00:00</updated><id>http://rjrpaz.github.io/virtualization/vmware/2021/08/24/Creating_VMWare_homelab</id><content type="html" xml:base="http://rjrpaz.github.io/virtualization/vmware/2021/08/24/Creating_VMWare_homelab.html"><![CDATA[<p>root@notebook:/home/roberto/Downloads# chmod +x VMware-Player-16.1.2-17966106.x86_64.bundle 
root@notebook:/home/roberto/Downloads# ./VMware-Player-16.1.2-17966106.x86_64.bundle 
Extracting VMware Installer…done.
Installing VMware Player 16.1.2
    Configuring…
[######################################################################] 100%
Installation was successful.</p>

<p>imagen 01
(2 licenses agreements)
al 07</p>

<p>Something odd happens on a few embedded equipments with Windows 10. Wifi interface just stop working. AP was working fine, but interface just stop sending or receiving data.</p>

<p>After a few manual tests I could confirm a few facts:</p>

<ul>
  <li>Host didn’t hang.</li>
  <li>Host operating system didn’t log anything about this event.</li>
  <li>AP didn’t log anything in particular at that moment.</li>
  <li>Windows command from console can’t renew IP (ipconfig /release, ipconfig /renew)</li>
</ul>

<p>I did make it working again when I used command to disable/enable wifi controller.</p>

<p>I wrote a batch script that can be run periodically using task manager. This script test if there is network connectivity. If not, then just restart interface.</p>

<p>Windows “ping.exe” command was not very useful. When host is down, it returns exit code different from 0, but when host is unreachable, it returns 0.  I had to use “fping” tool to detect network connectivity status in a useful manner for what I intended.</p>

<p>Batch script:</p>

<div class="language-console highlighter-rouge"><div class="highlight"><pre class="highlight"><code><span class="go">@echo off
set RUNDIR=C:\Users\stick new\Desktop\resetConnection

set LOG="%RUNDIR%\resetConnection.log"
set DELAY=10
set TESTINGHOST=10.0.0.1

</span><span class="gp">echo %DATE% %TIME% &gt;</span><span class="o">&gt;</span> %LOG%
<span class="go">
REM Connectivity test
</span><span class="gp">"%RUNDIR%\fping.exe" %TESTINGHOST% &gt;</span>nul
<span class="go">
REM echo %ERRORLEVEL%

IF ERRORLEVEL 1 (
goto :RECONNECT
) ELSE (
goto :SUCCESS
)


:RECONNECT
REM Reconnect interface
</span><span class="gp">echo No connectivity with %TESTINGHOST%  &gt;</span><span class="o">&gt;</span> %LOG%
<span class="go">
</span><span class="gp">echo Disabling interface  &gt;</span><span class="o">&gt;</span> %LOG%
<span class="go">netsh interface set interface "Wi-Fi" disabled

</span><span class="gp">timeout -T %DELAY% /NOBREAK &gt;</span>nul
<span class="go">
</span><span class="gp">echo Enabling interface  &gt;</span><span class="o">&gt;</span> %LOG%
<span class="go">netsh interface set interface "Wi-Fi" enabled
goto :END

:SUCCESS
</span><span class="gp">echo OK &gt;</span><span class="o">&gt;</span> %LOG%
<span class="go">
:END
</span><span class="gp">echo. &gt;</span><span class="o">&gt;</span> %LOG%
</code></pre></div></div>

<p>There are some manually defined variables in the batch file:</p>

<ul>
  <li>RUNDIR: folder where script and complementary files are located.</li>
  <li>DELAY: time in seconds that waits to enable interface, after disable it.</li>
  <li>TESTINGHOST: host used to test connectivity.</li>
</ul>

<p>This script assumes wifi interface name is “Wi-Fi”. This is used internally with command “netsh”. Wifi interface name can be determined running the following command:</p>

<div class="language-console highlighter-rouge"><div class="highlight"><pre class="highlight"><code><span class="go">netsh interface show interface
</span></code></pre></div></div>

<p>I also built an xml file (“resetConnection.xml”) to easily add batch script to task manager.</p>

<p>It is defined to run every 5 minutes. There is an internal reference
for batch script path inside that file, so if you change destination folder
you must modify <command /> entry in xml file.</p>

<p>To add batch file to task manager, start command prompt with
administator permissions and run:</p>

<div class="language-console highlighter-rouge"><div class="highlight"><pre class="highlight"><code><span class="go">schtasks /create /XML resetConnection.xml /TN "resetConnection"
</span></code></pre></div></div>

<p>This script creates a log file you could check after every run (“resetConnection.log”)
on the same folder.</p>

<p><strong>Project files available on github:</strong>
<a href="https://github.com/rjrpaz/resetConnection">https://github.com/rjrpaz/resetConnection</a></p>

<p>References:</p>

<ul>
  <li><a href="https://superuser.com/questions/403905/ping-from-windows-7-get-no-reply-but-sets-errorlevel-to-0">https://superuser.com/questions/403905/ping-from-windows-7-get-no-reply-but-sets-errorlevel-to-0</a></li>
  <li><a href="http://forums.whirlpool.net.au/archive/1663110#r28580508">http://forums.whirlpool.net.au/archive/1663110#r28580508</a></li>
  <li><a href="http://www.softpedia.com/get/Network-Tools/IP-Tools/Fping.shtml">http://www.softpedia.com/get/Network-Tools/IP-Tools/Fping.shtml</a></li>
  <li><a href="https://superuser.com/questions/696270/how-to-turn-on-wifi-via-cmd">https://superuser.com/questions/696270/how-to-turn-on-wifi-via-cmd</a></li>
  <li><a href="https://stackoverflow.com/questions/28855087/how-to-schedule-a-task-for-every-5-minutes-in-windows-command-prompt">https://stackoverflow.com/questions/28855087/how-to-schedule-a-task-for-every-5-minutes-in-windows-command-prompt</a></li>
</ul>]]></content><author><name></name></author><category term="virtualization" /><category term="vmware" /><summary type="html"><![CDATA[root@notebook:/home/roberto/Downloads# chmod +x VMware-Player-16.1.2-17966106.x86_64.bundle root@notebook:/home/roberto/Downloads# ./VMware-Player-16.1.2-17966106.x86_64.bundle Extracting VMware Installer…done. Installing VMware Player 16.1.2 Configuring… [######################################################################] 100% Installation was successful.]]></summary></entry><entry><title type="html">Restarting Windows WiFi interface when connection is lost</title><link href="http://rjrpaz.github.io/networking/scripting/windows/wifi/2017/11/03/Restarting_Windows_WiFi_Interface_When_Connection_Is_Lost.html" rel="alternate" type="text/html" title="Restarting Windows WiFi interface when connection is lost" /><published>2017-11-03T03:00:00+00:00</published><updated>2017-11-03T03:00:00+00:00</updated><id>http://rjrpaz.github.io/networking/scripting/windows/wifi/2017/11/03/Restarting_Windows_WiFi_Interface_When_Connection_Is_Lost</id><content type="html" xml:base="http://rjrpaz.github.io/networking/scripting/windows/wifi/2017/11/03/Restarting_Windows_WiFi_Interface_When_Connection_Is_Lost.html"><![CDATA[<p>Something odd happens on a few embedded equipments with Windows 10. Wifi interface just stop working. AP was working fine, but interface just stop sending or receiving data.</p>

<p>After a few manual tests I could confirm a few facts:</p>

<ul>
  <li>Host didn’t hang.</li>
  <li>Host operating system didn’t log anything about this event.</li>
  <li>AP didn’t log anything in particular at that moment.</li>
  <li>Windows command from console can’t renew IP (ipconfig /release, ipconfig /renew)</li>
</ul>

<p>I did make it working again when I used command to disable/enable wifi controller.</p>

<p>I wrote a batch script that can be run periodically using task manager. This script test if there is network connectivity. If not, then just restart interface.</p>

<p>Windows “ping.exe” command was not very useful. When host is down, it returns exit code different from 0, but when host is unreachable, it returns 0.  I had to use “fping” tool to detect network connectivity status in a useful manner for what I intended.</p>

<p>Batch script:</p>

<div class="language-console highlighter-rouge"><div class="highlight"><pre class="highlight"><code><span class="go">@echo off
set RUNDIR=C:\Users\stick new\Desktop\resetConnection

set LOG="%RUNDIR%\resetConnection.log"
set DELAY=10
set TESTINGHOST=10.0.0.1

</span><span class="gp">echo %DATE% %TIME% &gt;</span><span class="o">&gt;</span> %LOG%
<span class="go">
REM Connectivity test
</span><span class="gp">"%RUNDIR%\fping.exe" %TESTINGHOST% &gt;</span>nul
<span class="go">
REM echo %ERRORLEVEL%

IF ERRORLEVEL 1 (
goto :RECONNECT
) ELSE (
goto :SUCCESS
)


:RECONNECT
REM Reconnect interface
</span><span class="gp">echo No connectivity with %TESTINGHOST%  &gt;</span><span class="o">&gt;</span> %LOG%
<span class="go">
</span><span class="gp">echo Disabling interface  &gt;</span><span class="o">&gt;</span> %LOG%
<span class="go">netsh interface set interface "Wi-Fi" disabled

</span><span class="gp">timeout -T %DELAY% /NOBREAK &gt;</span>nul
<span class="go">
</span><span class="gp">echo Enabling interface  &gt;</span><span class="o">&gt;</span> %LOG%
<span class="go">netsh interface set interface "Wi-Fi" enabled
goto :END

:SUCCESS
</span><span class="gp">echo OK &gt;</span><span class="o">&gt;</span> %LOG%
<span class="go">
:END
</span><span class="gp">echo. &gt;</span><span class="o">&gt;</span> %LOG%
</code></pre></div></div>

<p>There are some manually defined variables in the batch file:</p>

<ul>
  <li>RUNDIR: folder where script and complementary files are located.</li>
  <li>DELAY: time in seconds that waits to enable interface, after disable it.</li>
  <li>TESTINGHOST: host used to test connectivity.</li>
</ul>

<p>This script assumes wifi interface name is “Wi-Fi”. This is used internally with command “netsh”. Wifi interface name can be determined running the following command:</p>

<div class="language-console highlighter-rouge"><div class="highlight"><pre class="highlight"><code><span class="go">netsh interface show interface
</span></code></pre></div></div>

<p>I also built an xml file (“resetConnection.xml”) to easily add batch script to task manager.</p>

<p>It is defined to run every 5 minutes. There is an internal reference
for batch script path inside that file, so if you change destination folder
you must modify <command /> entry in xml file.</p>

<p>To add batch file to task manager, start command prompt with
administator permissions and run:</p>

<div class="language-console highlighter-rouge"><div class="highlight"><pre class="highlight"><code><span class="go">schtasks /create /XML resetConnection.xml /TN "resetConnection"
</span></code></pre></div></div>

<p>This script creates a log file you could check after every run (“resetConnection.log”)
on the same folder.</p>

<p><strong>Project files available on github:</strong>
<a href="https://github.com/rjrpaz/resetConnection">https://github.com/rjrpaz/resetConnection</a></p>

<p>References:</p>

<ul>
  <li><a href="https://superuser.com/questions/403905/ping-from-windows-7-get-no-reply-but-sets-errorlevel-to-0">https://superuser.com/questions/403905/ping-from-windows-7-get-no-reply-but-sets-errorlevel-to-0</a></li>
  <li><a href="http://forums.whirlpool.net.au/archive/1663110#r28580508">http://forums.whirlpool.net.au/archive/1663110#r28580508</a></li>
  <li><a href="http://www.softpedia.com/get/Network-Tools/IP-Tools/Fping.shtml">http://www.softpedia.com/get/Network-Tools/IP-Tools/Fping.shtml</a></li>
  <li><a href="https://superuser.com/questions/696270/how-to-turn-on-wifi-via-cmd">https://superuser.com/questions/696270/how-to-turn-on-wifi-via-cmd</a></li>
  <li><a href="https://stackoverflow.com/questions/28855087/how-to-schedule-a-task-for-every-5-minutes-in-windows-command-prompt">https://stackoverflow.com/questions/28855087/how-to-schedule-a-task-for-every-5-minutes-in-windows-command-prompt</a></li>
</ul>]]></content><author><name></name></author><category term="networking" /><category term="scripting" /><category term="windows" /><category term="wifi" /><summary type="html"><![CDATA[Something odd happens on a few embedded equipments with Windows 10. Wifi interface just stop working. AP was working fine, but interface just stop sending or receiving data.]]></summary></entry><entry><title type="html">Comprimir una imagen de VMware Workstation Player</title><link href="http://rjrpaz.github.io/virtualization/2017/11/02/Comprimir_una_imagen_de_VMware_Workstation_Player.html" rel="alternate" type="text/html" title="Comprimir una imagen de VMware Workstation Player" /><published>2017-11-02T03:00:00+00:00</published><updated>2017-11-02T03:00:00+00:00</updated><id>http://rjrpaz.github.io/virtualization/2017/11/02/Comprimir_una_imagen_de_VMware_Workstation_Player</id><content type="html" xml:base="http://rjrpaz.github.io/virtualization/2017/11/02/Comprimir_una_imagen_de_VMware_Workstation_Player.html"><![CDATA[<p>A veces deseamos almacenar una imagen de  Workstation Player en la que hayamos estado trabajando (un prueba o un proyecto que ya no necesitemos, por ejemplo).</p>

<p>La mejor forma de liberar el espacio, es almacenar la imagen comprimida.</p>

<p>El proceso de compresión debería seguir algunos pasos:</p>

<ol>
  <li>Hacer espacio dentro de la imagen, con herramientas propias del sistema operativo.</li>
  <li>Instalar el defragmentador de disco que provee VMWare.</li>
  <li>Ejecutar el defragmentador de disco que provee VMWare.</li>
  <li>Finalmente, comprimir la imagen con algún compresor.</li>
</ol>

<h2 id="hacer-espacio-en-la-imagen-con-las-herramientas-que-provee-el-sistema-operativo-virtual">Hacer espacio en la imagen con las herramientas que provee el sistema operativo virtual.</h2>

<p>En este ejemplo, el sistema operativo virtual es CentOS 7.</p>

<p>Existen muchos comandos que podríamos ejecutar para realizar limpieza, y varía
según las aplicaciones que estén instaladas, si queremos mantener los archivos
de log, la información de la base de datos, etc.</p>

<p>A modo de ejemplo, el único comando que voy a ejecutar es limpiar el caché del
gestor de paquetes del sistema operativo</p>

<p>Ejemplo:</p>

<div class="language-console highlighter-rouge"><div class="highlight"><pre class="highlight"><code><span class="gp">root@localhost:~$</span><span class="w"> </span>yum clean all
</code></pre></div></div>

<p><img src="/assets/images/2017-11-02-01.png" alt="Yum clean all" /></p>

<h2 id="defragmentar-el-disco-de-la-imagen-con-las-herramientas-que-provee-vmware">Defragmentar el disco de la imagen con las herramientas que provee VMWare.</h2>

<p>VMWare provee comandos que permiten defragmentar el sistema operativo emulado.
En el caso de Linux, y dependiendo de la distribución utilizada, puede que estas
herramientas sean instalables desde el mismo gestor de paquetes del sistema operativo,
o bien deban ser instaladas a mano.</p>

<h3 id="en-el-caso-de-que-sean-instalables-desde-el-gestor-de-paquetes">En el caso de que sean instalables desde el gestor de paquetes:</h3>

<div class="language-console highlighter-rouge"><div class="highlight"><pre class="highlight"><code><span class="gp">root@localhost:~$</span><span class="w"> </span>yum <span class="nb">install </span>open-vm-tools
</code></pre></div></div>

<h3 id="para-instalarlo-a-mano-debemos-ejecutar">Para instalarlo a mano, debemos ejecutar</h3>

<p><img src="/assets/images/2017-11-02-02.png" alt="Instalar open-vm-tools" /></p>

<p><img src="/assets/images/2017-11-02-03.png" alt="Instalar open-vm-tools" /></p>

<p>En este punto, disponemos de un media de instalación virtual listo para ser utilizado
en el sistema emulado:</p>

<div class="language-console highlighter-rouge"><div class="highlight"><pre class="highlight"><code><span class="gp">root@localhost:~$</span><span class="w"> </span>mount /dev/cdrom /mnt
</code></pre></div></div>

<p><img src="/assets/images/2017-11-02-04.png" alt="Instalar open-vm-tools" /></p>

<p>Nos posicionamos en algún sitio donde podamos descomprimir el archivo con las herramientas:</p>

<div class="language-console highlighter-rouge"><div class="highlight"><pre class="highlight"><code><span class="gp">root@localhost:~$</span><span class="w"> </span><span class="nb">cd</span> /tmp
<span class="gp">root@localhost: tmp$</span><span class="w"> </span><span class="nb">tar </span>zxvf /mnt/VMwareTools-10.1.6-5214329.tgz
</code></pre></div></div>
<p><img src="/assets/images/2017-11-02-05.png" alt="Instalar open-vm-tools" />
<img src="/assets/images/2017-11-02-06.png" alt="Instalar open-vm-tools" /></p>

<p>Nos paramos dentro del directorio descomprimido y ejecutamos el instalador:</p>

<div class="language-console highlighter-rouge"><div class="highlight"><pre class="highlight"><code><span class="gp">root@localhost: tmp$</span><span class="w"> </span><span class="nb">cd </span>vmware-tools-distrib
<span class="gp">root@localhost: vmware-tools-distrib$</span><span class="w"> </span>./vmware-install.pl
</code></pre></div></div>

<p><img src="/assets/images/2017-11-02-07.png" alt="Instalar open-vm-tools" /></p>

<p>El instalador consulta algunos parámetros del sistema y con ello
instala las herramientas</p>

<h2 id="correr-el-defragmentador-de-disco">Correr el defragmentador de disco</h2>

<div class="language-console highlighter-rouge"><div class="highlight"><pre class="highlight"><code><span class="gp">root@localhost: $</span><span class="w"> </span>vmware-toolbox-cmd disk shrinkonly
</code></pre></div></div>

<p><img src="/assets/images/2017-11-02-08.png" alt="Ejecutar open-vm-tools" /></p>

<p>Al cabo de un tiempo:</p>

<p><img src="/assets/images/2017-11-02-09.png" alt="Ejecutar open-vm-tools" /></p>

<p>Una vez finalizado, realizamos un shutdown limpio del equipo virtual.</p>

<h2 id="comprimir-la-imagen-con-un-compresor">Comprimir la imagen con un compresor.</h2>

<p>En este caso utilizo el compresor <strong>7z</strong>.</p>

<div class="language-console highlighter-rouge"><div class="highlight"><pre class="highlight"><code><span class="gp">roberto@desktop: vmware $</span><span class="w"> </span>7z a CentOS_ProyectoX
</code></pre></div></div>

<p><img src="/assets/images/2017-11-02-10.png" alt="Ejecutar open-vm-tools" /></p>

<p>El directorio de 1.6 Gbytes se almacenó en un archivo de 387 Mbytes.</p>]]></content><author><name></name></author><category term="virtualization" /><summary type="html"><![CDATA[A veces deseamos almacenar una imagen de Workstation Player en la que hayamos estado trabajando (un prueba o un proyecto que ya no necesitemos, por ejemplo).]]></summary></entry><entry><title type="html">Transferencia eficiente de archivos grandes en un entorno con bajo ancho de banda</title><link href="http://rjrpaz.github.io/linux/networking/tips/2016/12/23/Transferencia_eficiente_de_archivos_grandes_en_un_entorno_con_bajo_ancho_de_banda.html" rel="alternate" type="text/html" title="Transferencia eficiente de archivos grandes en un entorno con bajo ancho de banda" /><published>2016-12-23T03:00:00+00:00</published><updated>2016-12-23T03:00:00+00:00</updated><id>http://rjrpaz.github.io/linux/networking/tips/2016/12/23/Transferencia_eficiente_de_archivos_grandes_en_un_entorno_con_bajo_ancho_de_banda</id><content type="html" xml:base="http://rjrpaz.github.io/linux/networking/tips/2016/12/23/Transferencia_eficiente_de_archivos_grandes_en_un_entorno_con_bajo_ancho_de_banda.html"><![CDATA[<p>En ocasiones debemos lidiar con algún host que tiene una conexión a Internet de “baja velocidad” (término que varía su significado según la época).</p>

<p>Por ejemplo, en un sitio debemos lidiar con una conexión ADSL de 3Mbps de bajada (algo así como 300Kbps de subida), compartida entre todos los integrantes de una empresa. Uno de ellos decide subir un archivo de 160Mb a su GDrive. La subida de ese archivo afecta el uso de la red durante bastante tiempo. Afecta a otros servicios, como puede ser la resolución DNS por ejemplo, y por ende termina afectando el funcionamiento generalizado de la red.</p>

<p>Independientemente de las acciones que podamos realizar a nivel de filtrado para evitar cierto tipo de tráfico, tenemos mecanismos para realizar copias largas de manera eficiente.</p>

<p>El comando rsync posee, entre sus múltiples atributos, uno que fija el límite superior de ancho de banda para una transferencia. Este atributo es: “–bwlimit”</p>

<p>También debemos contemplar los casos en que la transferencia se corta por algún motivo. Debido a esto, sería deseable que no debamos empezar desde cero nuevamente con la transferencia. Además, mientras menos ancho de banda destinemos a la transferencia, mayor será el tiempo de duración de la transferencia total, por lo que crecen las posibilidades de que la transferencia se corte en algún punto.</p>

<p>Los pasos recomendables entonces, involucran que primero se divida el archivo en “porciones” manejables. Para ello contamos con el comando “split”:</p>

<div class="language-console highlighter-rouge"><div class="highlight"><pre class="highlight"><code><span class="gp">roberto@desktop:~$</span><span class="w"> </span><span class="nb">split</span> <span class="nt">-b</span> 1m bigFile
</code></pre></div></div>

<p>En este caso partimos el archivo “bigFile” en pedazos de 1Mb. Los pedazos son nombrados por defecto con 3 letras, xaa, xab, etc. y así sucesivamente, según la cantidad de pedazos que sean.</p>

<p>Luego copiamos los pedazos al destino:</p>

<div class="language-console highlighter-rouge"><div class="highlight"><pre class="highlight"><code><span class="gp">roberto@desktop:~$</span><span class="w"> </span>rsync <span class="nt">-avz</span> <span class="nt">-e</span> ssh <span class="nt">--progress</span> <span class="nt">--bwlimit</span><span class="o">=</span>30 x?? destHost:destDir/
</code></pre></div></div>

<p>En este caso estamos copiando todos los archivos de 3 letras, cuyo nombre comience con “x”, al host “destHost”, directorio “destDir”. Además el ancho de banda utilizado por el comando no debería superara los 30Kbps. En la práctica, y salvo algunos transitorios, esto último se respeta con suficiente precisión:</p>

<p>Al utilizar el comando rsync, podemos interrumpir la ejecución si es necesario, y cuando lanzamos nuevamente el comando, retomará desde el último pedazo entero que haya podido copiar.</p>

<p>Una vez que hemos copiado todos los pedazos, podemos unirlos en el destino, para conformar nuevamente el archivo original:</p>

<p>Ejecutamos en el equipo de destino:</p>

<div class="language-console highlighter-rouge"><div class="highlight"><pre class="highlight"><code><span class="gp">roberto@destHost:~/destDir$</span><span class="w"> </span><span class="nb">cat </span>x?? <span class="o">&gt;</span> bigFile
</code></pre></div></div>

<p>Además podemos correr una suma hash sobre el archivo en el origen y el destino, para ver si quedaron iguales:</p>

<p>En el origen:</p>

<div class="language-console highlighter-rouge"><div class="highlight"><pre class="highlight"><code><span class="gp">roberto@desktop:~$</span><span class="w"> </span><span class="nb">md5sum </span>bigFile
<span class="go">a04a47315647585d3243440d411aa048 bigFile
</span></code></pre></div></div>

<p>En el destino:</p>

<div class="language-console highlighter-rouge"><div class="highlight"><pre class="highlight"><code><span class="gp">roberto@destHost:~/destDir$</span><span class="w"> </span><span class="nb">md5sum </span>bigFile
<span class="go">a04a47315647585d3243440d411aa048 bigFile
</span></code></pre></div></div>

<p>Una vez que controlamos que el archivo ha sido copiado sin error, podemos eliminar los pedazos en el origen y el destino.</p>]]></content><author><name></name></author><category term="linux" /><category term="networking" /><category term="tips" /><summary type="html"><![CDATA[En ocasiones debemos lidiar con algún host que tiene una conexión a Internet de “baja velocidad” (término que varía su significado según la época).]]></summary></entry><entry><title type="html">Generar un clon con VMware Workstation Player</title><link href="http://rjrpaz.github.io/virtualization/ccripting/2016/03/28/Generar_un_clon_con_VMware_Workstation_Player.html" rel="alternate" type="text/html" title="Generar un clon con VMware Workstation Player" /><published>2016-03-28T03:00:00+00:00</published><updated>2016-03-28T03:00:00+00:00</updated><id>http://rjrpaz.github.io/virtualization/ccripting/2016/03/28/Generar_un_clon_con_VMware_Workstation_Player</id><content type="html" xml:base="http://rjrpaz.github.io/virtualization/ccripting/2016/03/28/Generar_un_clon_con_VMware_Workstation_Player.html"><![CDATA[<p>VMWare Workstation Player es una versión free y simplificada de VMWare Workstation Pro. Es un hypervisor de tipo 2, con una interface mucho más sencilla.</p>

<p>Una de las opciones que podemos llegar a extrañar, es que no permite realizar un clonado de una máquina virtual para generar otra.</p>

<p>De cualquier manera, existe una forma relativamente sencilla de realizar un clonado a mano:</p>

<ol>
  <li>Copiar el directorio que define una máquina virtual, con un nuevo nombre</li>
  <li>Dentro de este nuevo directorio, renombrar los archivos, reemplazando las apariciones del nombre original por el nombre nuevo</li>
  <li>Renombrar las menciones al nombre original en el archivo con extensión .vmx</li>
  <li>Renombrar las menciones al nombre original en el archivo con extensión .vmxf</li>
  <li>Renombrar las menciones al nombre original en el archivo con extensión .vmdk</li>
</ol>

<p>Ejemplo:</p>

<div class="language-bash highlighter-rouge"><div class="highlight"><pre class="highlight"><code>
roberto@roberto:~<span class="nv">$ </span><span class="nb">cd </span>vmware
roberto@roberto:~/vmware<span class="nv">$ </span><span class="nb">ls</span> <span class="nt">-l</span>
total 4
drwxr-xr-x 2 roberto roberto 4096 mar 21 21:27 PXEServer
roberto@roberto:~/vmware<span class="nv">$ </span><span class="nb">cp</span> <span class="nt">-a</span> PXEServer VM1
roberto@roberto:~/vmware<span class="nv">$ </span><span class="nb">cd </span>VM1
roberto@roberto:~/vmware/VM1<span class="nv">$ </span>rename <span class="s1">'s/PXEServer/VM1/'</span> <span class="k">*</span>
roberto@roberto:~/vmware/VM1<span class="nv">$ </span><span class="nb">sed</span> <span class="nt">-i</span> <span class="s1">'s/PXEServer/VM1/g'</span> VM1.vmx
roberto@roberto:~/vmware/VM1<span class="nv">$ </span><span class="nb">sed</span> <span class="nt">-i</span> <span class="s1">'s/PXEServer/VM1/g'</span> VM1.vmxf
roberto@roberto:~/vmware/VM1<span class="nv">$ </span><span class="nb">sed</span> <span class="nt">-i</span> <span class="s1">'s/PXEServer/VM1/g'</span> VM1.vmdk
roberto@roberto:~/vmware/VM1<span class="err">$</span>

</code></pre></div></div>

<p>(“rename” puede llegar a requerir instalación por separado. Es un comando muy útil, así que lo recomiendo ferviertemente).</p>

<p>Cuando ejecutamos VMPlayer, podemos ubicar esta nueva máquina virtual desde la opción “File” -&gt; “Open a Virtual Machine”, y seleccionamos el archivo .vmx de la nueva máquina. A partir de ese momento la nueva máquina virtual aparece listada.</p>

<p>Al arrancar la máquina virtual, VMPlayer se da cuenta que su origen es manual y nos presenta la siguiente pantalla:</p>

<p><img src="/assets/images/Captura-de-pantalla-de-2016-03-21-221754.png" alt="Pregunta si es copiado" /></p>

<p>Elegimos la opción por defecto “I Copied It”. De esta forma, VMPlayer reacomoda los valores necesarios de hardware para que esta nueva máquina virtual no tenga conflictos con la anterior (dirección IP, mac address, etc.)</p>

<p>Si no surgen inconvenientes, estamos en condiciones de poder utilizar simultáneamente ambas máquinas virtuales.</p>]]></content><author><name></name></author><category term="virtualization" /><category term="ccripting" /><summary type="html"><![CDATA[VMWare Workstation Player es una versión free y simplificada de VMWare Workstation Pro. Es un hypervisor de tipo 2, con una interface mucho más sencilla.]]></summary></entry><entry><title type="html">Rebooteando TPLINK TL-R470T+ mediante script</title><link href="http://rjrpaz.github.io/networking/scripting/perl/2016/03/21/Rebooteando_TPLINK_TL-R470T+_mediante_script.html" rel="alternate" type="text/html" title="Rebooteando TPLINK TL-R470T+ mediante script" /><published>2016-03-21T03:00:00+00:00</published><updated>2016-03-21T03:00:00+00:00</updated><id>http://rjrpaz.github.io/networking/scripting/perl/2016/03/21/Rebooteando_TPLINK_TL-R470T+_mediante_script</id><content type="html" xml:base="http://rjrpaz.github.io/networking/scripting/perl/2016/03/21/Rebooteando_TPLINK_TL-R470T+_mediante_script.html"><![CDATA[<p>Por razones que no siempre están claras, ciertos equipos de red se clavan de manera periódica. Típicamente este “cuelgue” surge a partir de un escenario de elevada carga durante mucho tiempo, o bien se presenta a partir de un uptime prolongado. Sea cual fuere el motivo, a veces es necesario recurrir al rebooteo periódico de algún equipo, previniendo un cuelgue posterior que decididamente nos arruine el tiempo de disponibilidad de nuestro servicio.</p>

<p>Según el equipo que debemos reiniciar, puede suceder que nuestro script deba conectarse usando http, ssh, telnet, etc. En nuestro caso, el equipo que vamos a reiniciar por script es un Tplink TL-R470T+.</p>

<p>Si accedemos a la interface de administración del mismo, notamos lo siguiente:</p>

<p><img src="/assets/images/Captura-de-pantalla-de-2016-03-21-132324.png" alt="Pantalla de login" /></p>

<p>
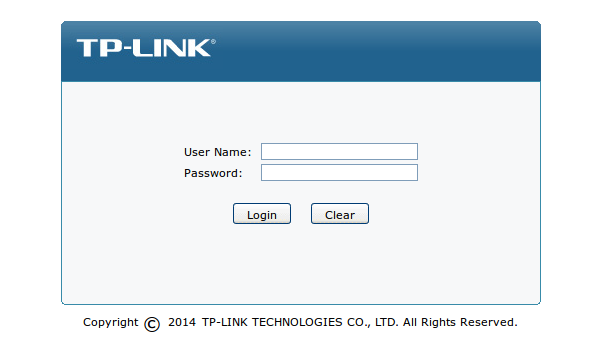
el ingreso de usuario y contraseña no se hace por un mecanismo de autenticación http básico, sino que está integrado al desarrollo del firmware. Esto dificultaría el acceso por http.</p>

<p>Por otra parte, en el menú “Maintenance” -&gt; “Admin Setup”, pestaña “Login Parameter”, aparece esto:</p>

<p><img src="/assets/images/Captura-de-pantalla-de-2016-03-21-133651.png" alt="Login Parameter" /></p>

<p>
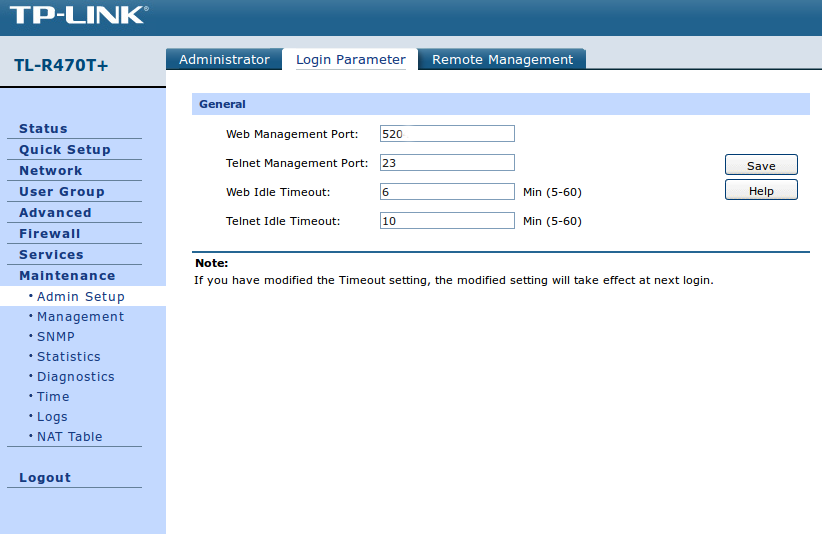
hay mención a un servicio de telnet. Utilizaremos este camino para reiniciar el equipo desde nuestro script.</p>

<p>Luego de indagar en la interface de telnet, queda claro que es posible reiniciar el equipo por este medio. La secuencia de comandos para hacerlo es la siguiente:</p>

<p><img src="/assets/images/Captura-de-pantalla-de-2016-03-21-135522.png" alt="Telnet session" /></p>

<p><img src="/assets/images/Captura-de-pantalla-de-2016-03-21-135956.png" alt="Telnet session" /></p>

<p>
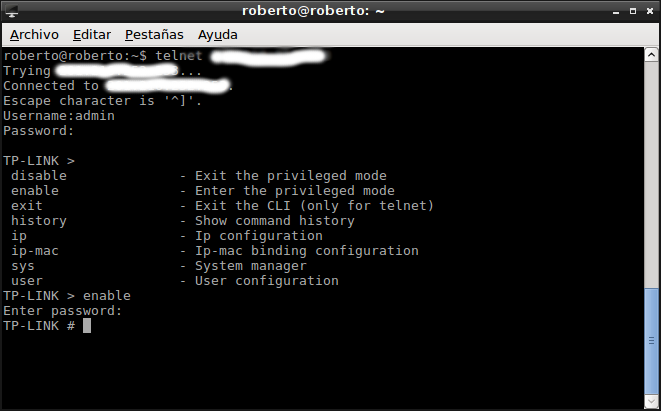
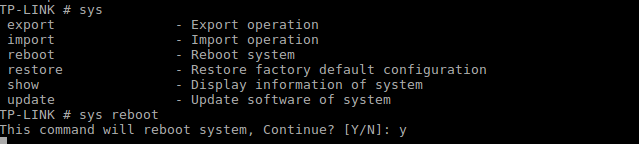
Ese es el camino que debe seguir nuestro script.
Diseñando el script</p>

<p>El script está hecho en perl. Para realizar sesiones interactivas (como telnet) desde perl, se puede recurrir al módulo de Expect, o bien se puede recurrir a algún módulo específico de telnet. En mi caso voy a utilizar el módulo Net::Telnet. El código del script se muestra a continuación:</p>

<div class="language-perl highlighter-rouge"><div class="highlight"><pre class="highlight"><code>    <span class="c1">#!/usr/bin/perl</span>
    <span class="k">use</span> <span class="nv">strict</span><span class="p">;</span>
    <span class="k">use</span> <span class="nn">Net::</span><span class="nv">Telnet</span><span class="p">;</span>
    <span class="k">my</span> <span class="nv">$username</span> <span class="o">=</span> <span class="p">'</span><span class="s1">admin</span><span class="p">';</span>
    <span class="k">my</span> <span class="nv">$password</span> <span class="o">=</span> <span class="p">'</span><span class="s1">admin</span><span class="p">';</span>
    <span class="k">my</span> <span class="nv">$host</span> <span class="o">=</span> <span class="p">'</span><span class="s1">192.168.0.1</span><span class="p">';</span>
    <span class="k">my</span> <span class="nv">$telnet</span> <span class="o">=</span> <span class="k">new</span> <span class="nn">Net::</span><span class="nv">Telnet</span> <span class="p">(</span> <span class="s">Timeout</span><span class="o">=&gt;</span><span class="mi">10</span><span class="p">,</span> <span class="s">Errmode</span><span class="o">=&gt;</span><span class="p">'</span><span class="s1">die</span><span class="p">');</span>
    <span class="nv">$telnet</span><span class="o">-&gt;</span><span class="nb">open</span><span class="p">(</span><span class="nv">$host</span><span class="p">);</span>
    <span class="nv">$telnet</span><span class="o">-&gt;</span><span class="nv">waitfor</span><span class="p">('</span><span class="s1">/Username:$/i</span><span class="p">');</span>
    <span class="nv">$telnet</span><span class="o">-&gt;</span><span class="k">print</span><span class="p">(</span><span class="nv">$username</span><span class="p">);</span>
    <span class="nv">$telnet</span><span class="o">-&gt;</span><span class="nv">waitfor</span><span class="p">('</span><span class="s1">/Password:$/i</span><span class="p">');</span>
    <span class="nv">$telnet</span><span class="o">-&gt;</span><span class="k">print</span><span class="p">(</span><span class="nv">$password</span><span class="p">);</span>
    <span class="nv">$telnet</span><span class="o">-&gt;</span><span class="nv">waitfor</span><span class="p">('</span><span class="s1">/&gt; $/i</span><span class="p">');</span>
    <span class="nv">$telnet</span><span class="o">-&gt;</span><span class="k">print</span><span class="p">('</span><span class="s1">enable</span><span class="p">');</span>
    <span class="nv">$telnet</span><span class="o">-&gt;</span><span class="nv">waitfor</span><span class="p">('</span><span class="s1">/Enter password: $/i</span><span class="p">');</span>
    <span class="nv">$telnet</span><span class="o">-&gt;</span><span class="k">print</span><span class="p">(</span><span class="nv">$password</span><span class="p">);</span>
    <span class="nv">$telnet</span><span class="o">-&gt;</span><span class="nv">waitfor</span><span class="p">('</span><span class="s1">/# $/i</span><span class="p">');</span>
    <span class="nv">$telnet</span><span class="o">-&gt;</span><span class="k">print</span><span class="p">('</span><span class="s1">sys reboot</span><span class="p">');</span>
    <span class="nv">$telnet</span><span class="o">-&gt;</span><span class="nv">waitfor</span><span class="p">('</span><span class="s1">/:/i</span><span class="p">');</span>
    <span class="nv">$telnet</span><span class="o">-&gt;</span><span class="k">print</span><span class="p">('</span><span class="s1">Y</span><span class="p">');</span>
    <span class="nb">exit</span><span class="p">(</span><span class="mi">0</span><span class="p">);</span>
</code></pre></div></div>

<p>En las líneas 5-7 se definen las variables para acceder al equipo (usuario, contraseña, hostname o IP).</p>

<p>En la línea 9 se define el objeto que va a manejar la sesión de telnet.</p>

<p>En la línea 10 comienza la sesión de telnet propiamente dicha. Como primer paso, esperamos que nos devuelva la cadena “Username:”, en la línea 11. En la línea 12 ingresamos el usuario.</p>

<p>Como puede verse, usamos el método “waitfor” para indicar lo que esperamos que devuelva la sesión, por medio de una expresión regular. En el caso de la linea 11, indicamos que estamos esperando la cadena “Username:” al final de una línea, sin espacios luego del “:”.</p>

<p>Se procede de manera similar con cada uno de los comandos que debe ingresarse. Como usamos expresiones regulares, no estamos obligados a identificar la cadena completa que esperamos que nos devuelva (que de hecho, y según la ocasión, podría ser variable). En el caso de la línea 15, por ejemplo, indicamos que estamos esperando por la cadena “&gt; ” al final de una línea, cuando lo que nos devuelve realmente es: “TP-LINK &gt;”. Siempre que indiquemos un patrón que sea único en la línea, y que no confunda al párser de texto, no deberíamos tener inconvenientes.</p>

<p>Cuando desarrollemos el script, si al momento de ejecutarlo, el mismo falla indicando la línea en donde se produjo el timeout, eso típicamente nos indica que estamos esperando un patrón de texto incorrecto. Deberemos controlar entonces que el patrón esté bien definido, o deberemos simplificarlo.</p>

<p>El código del script está disponible aquí:</p>

<p><a href="https://github.com/rjrpaz/reboot_tlr470t">https://github.com/rjrpaz/reboot_tlr470t</a></p>

<p>El resto implica solo agregar este script al cron, en función del momento que hayamos elegido para ejecutarlo.</p>]]></content><author><name></name></author><category term="networking" /><category term="scripting" /><category term="perl" /><summary type="html"><![CDATA[Por razones que no siempre están claras, ciertos equipos de red se clavan de manera periódica. Típicamente este “cuelgue” surge a partir de un escenario de elevada carga durante mucho tiempo, o bien se presenta a partir de un uptime prolongado. Sea cual fuere el motivo, a veces es necesario recurrir al rebooteo periódico de algún equipo, previniendo un cuelgue posterior que decididamente nos arruine el tiempo de disponibilidad de nuestro servicio.]]></summary></entry></feed>